This article describes how to configure the RUX Rentals Avalara AvaTax Connector
AppSource listing for the RUX Rentals Avalara Avatax Connector
Important: Your Avatax key user who has access to the Avalara portal and your license key is needed to run this setup.
1. Find the Connector in AppSource
Open Microsoft AppSource from within Business Central. In the search bar, type "RUX Rent". You'll see the RUX Rentals Avalara AvaTax Connector in the results. 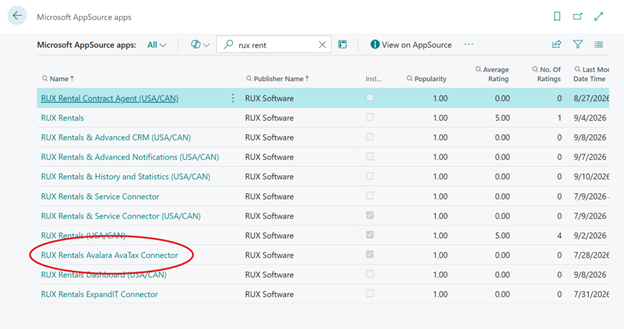
- In Business Central, go to the search icon (magnifying glass) and type “Appsource”
- Or navigate to Apps > AppSource from the main menu.
- Search fro “RUX Rent” to see RUX Rental Apps
2. Install the connector
Click on the connector to open its detail page, then click Install. Business Central will download and install the extension into your environment. This may take a few minutes.
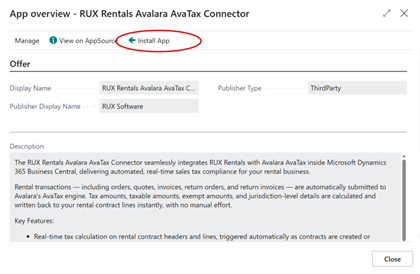
- Click on the Rux Rentals Avalara AvaTax Connector card
- Review the app details, then click the “Install App” button
- Wait for the installation to complete (typically 2 to 5 minutes)
3. Enable Avalara in Rental Management Setup
After installation, new Avalara settings appear in your Rental Management Setup. You need to enable the connector and enter your Avalara license key. 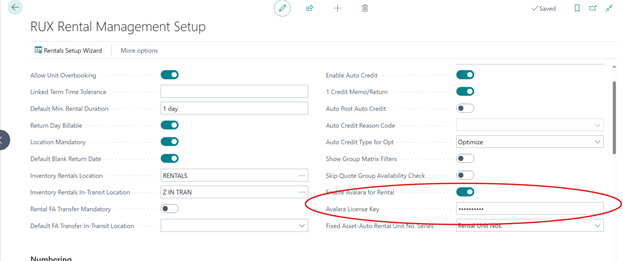
- Seach for “Rental Management Setup” in Business Central
- Scroll to the Avalara Section (new after installation)
- Toggle on Enable Avalara for Rental
- Enter your Avalara License Key in the field provided
- Your license key is available from your Avalara account portal or your Avalara account manager. RUX cannot assist with your Avalara license key.
4. Assign User Permissions
Users who are not SUPER administrators need the RM Avalara permissions set to work with Avalara enabled rental documents.
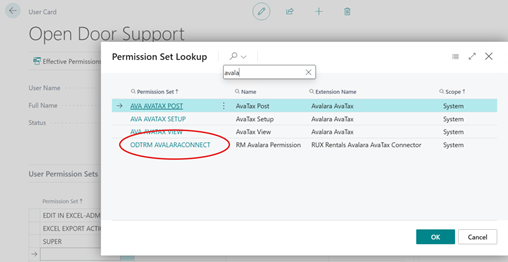
- Search for “Permission Sets” in Business Central
- Find RM AVALARA in the list (It may also be listed under ODTRM AVALARA)
- Assign this permission set to all users who will work with rental documents and Avalara tax
- SUPER role users already have access and do not need this assigned separately
5. Validate the Connection
Once everything is configured, open any rental contract and use the Validate AVA API Connection action to confirm the connector can reach the Avalara AvaTax API. 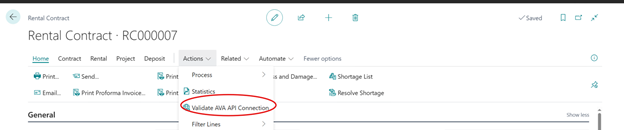
- Open any rental contract in Business Central
- Look for the Validate AVA API Connection action in the action bar
- Click it to test the connection to Avalara
- A success message confirms your setup is complete and taxes will calculate automatically
6. Post-Install Checklist
Verify each item to confirm a successful setup.
- Avalara AvaTax app installed in Business Central
- RUX Rentals installed and configured
- RUX Rentals Avalara AvaTax Connector installed from AppSource
- Enable Avalara for Rental toggled on in Rental Management Setup
- Avalara License Key entered
- RM AVALARA permission set assigned to non-SUPER users
- Validate AVA API Connection run successfully
IMPORTANT: Step 3 could be required after Business Central or apps updates. Should users receive a ‘bad request’ error from rentals transactions, the solution is to re-enter the license key in Rental Management Setup. It’s important to re-enter the key and not just visually confirm it’s there. Re-entering the key triggers the validation to the Avatax service.
Was this article helpful?
That’s Great!
Thank you for your feedback
Sorry! We couldn't be helpful
Thank you for your feedback
Feedback sent
We appreciate your effort and will try to fix the article